Showing posts with label general GAFE. Show all posts

Tuesday, June 7, 2016

An Interview With Nick Reilly

New Feature: Div1 Edtech in EPSB Interviews

This month we are starting a new monthly feature: educational technology interviews with classroom teachers. Our first interview is with EPSB teacher and occasional Div1 Edtech blogger, Nick Reilly. Nick currently teaches grade four and “junior high stuff, too”. You can find Nick as @NotebookNick on Twitter and on Google+.


The Interview


What technology skills should students have before coming into the grade(s) you teach?

Students should be able to log into their accounts, create Google Docs and have familiarity with the internet. (Nick blogged about this previously, check out Preparing For Division 2 for a more detailed answer).


Where do you get your educational technology ideas?

I definitely get ideas from more than one spot: Twitter, Google+, Professional Development Days, professional reading, colleagues and blogs.


What type of technology do you use in your school?

We have laptops, desktop computers, Chromebooks, 3D Printers, and Smartboards.


Imagine you only could keep one technology at your school. From the ones you listed about what would be the one you would keep? 

Chromebooks

How has technology changed the way you teach?

It defines the way I teach. It opens so many doors.

How do you decide what is worthwhile for students to learn through technology, given the literacy and skill challenges in your class?

With assistive technology playing a significant role for some of my kids, sometimes technology helps to overcome basic skill deficiencies and allows them to complete a task they normally would not be able to unassisted. Students choose to work with technology when given the choice, and often it is to help them in some capacity. Whether it is listening to something instead of reading it, or finding a different medium for information when researching, the end goal is still the same for most of my tasks. Completion of the task to the best of their abilities is the main goal. How students get there is up to them.


What apps or technology tools do you use? Are there any that you use for specific projects?

I use a number of apps from the Google suite (Classroom, Docs, etc.) and some that tie in nicely. We've recently been writing with Storybird, and using Prodigy and Mathletics for math.


What are your hopes for educational technology in the future in your classroom? Alberta? Canada? Globally?

I think Expeditions is a huge step in the right direction. Being able to give kids experiences they normally wouldn't be able to have is the right way to go about things. Technology as a bridge to bigger and better things for learners is where it should be going.


If you could add a question to this interview, what would it be?

What is one piece of technology would you like to try in your classroom that you haven't had an opportunity to yet?
________________________________________________________________________

A huge thank you to Nick Reilly for being the first interviewee. His question has been added to the list of interview questions! If you would like to suggest someone we should interview, leave a comment! Check back in July for the next interview.


Sunday, October 25, 2015

Add The World To Your Lessons

Google Apps For Education (GAFE) offers great opportunities for collaboration and connecting students to other students in the world. However, in division one, this is not always easy due to students' skills. Google Hangouts offers a simple way to connect your classroom to other classrooms through a webcam.

There are actually three types of Hangouts. You can do instant messaging/chat. You can do a Hangout video call. Finally, there is Hangouts on Air which is when you broadcast your video call. This post will focus on the video call hangout.


Tools You Will Need

A Google Account
To participate in a Google Hangout, you will need a gmail address or a GAFE email address. The person/class you are connecting with will also need a Google account. To connect with another person/class you will need to be Google+ contacts with them or you need their gmail address. 

Camera
You can use a built-in camera on your device however an external webcam usually offers better quality. The first time you use the camera, you may be asked to "allow" it in a pop-up window.

Microphone
You can use the built-in mic in your device. If your desktop computer does not have one, then you will have to use an external one.  The first time you use the microphone, you may be asked to "allow" it in a pop-up window.

Speakers
You can use the built-in speakers from your device. However, sometimes you will get feedback or echoing, so you may want to use external speakers that you can move to limit this. If the conversation is one-to-one consider using a headset mic.

Bandwidth
If you have a poor internet connection or slow computer speed, you can adjust the bandwidth. The lower the bandwidth will also lower the quality of the Hangout.


Make Learning Relevant: Add The World To A Lesson


What Is A Mystery Hangout?

"Mystery" events started (and still continue) with Skype." Mystery Skype is an educational game, invented by teachers, played by two classrooms on Skype. The aim of the game is to guess the location of the other classroom by asking each other questions." https://education.microsoft.com/skypeintheclassroom

The same process can be used with Google Hangouts. Watch the video below to see how it works.


Not Just For Social Studies

There are a number of different ways teachers have begun to use Google Hangouts and Skype, not just Mystery Hangouts. Really it is only limited by a teacher's imagination and connections. Here are some events and activities:


Please leave a note in the comments for other events and opportunities!


Make It A Part Of A Larger Collaboration

This summer I had an opportunity to see how division one teachers have used Hangouts in combination with other GAFE resources to connect their students with others. A class from Alberta connected with a class from Illinois through Google Docs and Google Hangouts.


Collaborate With Other Teachers

This summer I participated in Project Overseas. My team was made up of teachers from Ontario, New Brunswick and Alberta (me). Prior to leaving we needed to collaborate and plan. We used monthly Hangouts as a way to communicate face-to-face. It provided a much easier and effective way to collaborate before we left than by only using email.


Pitfalls

Anyone who has used technology in class, from old-school overhead projectors to iPads, knows problems WILL happen.  Sometimes these are avoidable (properly charged devices) and sometimes they are inevitable (light bulb dies). Using Google Hangouts is no different. There are some issues that are avoidable, if you know what to plan for, and some you will have to deal with when they happen.  One thing I like to do to be proactive is do a test Hangout with the teacher I'm connecting with before we connect during class time.

What timezone is that again?
My student teacher learned this the hard way last year. He did not double check the timezone that the class we were going to Hangout with was in. As a result, they were not in class when we tried to call them.

Webcams and Microphones - Give Access!
When a user first uses a webcam/camera or microphone on a device, the device will often ask for you to allow this. It is a small pop up that sometimes can be missed.

Bandwidth
If you know your school's internet is going to be heavily used on a certain day, avoid setting up at Hangout for that day.


Okay, So How Do I Find Like Minded Teachers?

Twitter

Social media is the best way to locate another class to connect with. On Twitter, you can start following like-minded educators. You can also follow hashtags, such as:


Google+

Google+ is another great resource for connecting. Again, you can add like-minded educators to your circles. You may want to add Google in Education on Google+ to your circles. This is Google’s official education account on Google+ and they host and post educational Hangouts. You can also join communities that are all about making connections, such as:


Facebook
I try not to use my FB account for teaching. However, I am sure there are a number or groups there for Google Hangouts or Skype as well.

Please leave a note in the comments for FB events and opportunities you know about!

Further Reading/Viewing


 * Disclaimer: As Hangouts has gone through many changes, many of these links do not have updated information.

Monday, August 25, 2014

Calgary Summit: Apps, Extensions, Add-Ons, Links and Tips Oh My

This summer I went to the first annual EdTechTeam Calgary Summit featuring Google for Education. This was my third "GAFE Summit". My primary reason for going to such an intense event during my summer HOLIDAYS was to get more experience with presenting. However, I also went because my previous two experiences were energizing and motivating.

As I presented three times, I missed out on attending a number of great sessions. However, I still came away with a number of ideas and contacts. I hope to share some of the ideas/links that I found inspiring and interesting. If you want to delve deeper than what my blog post provides, you can check out the Collaborative Notes from the Summit.

Going to GAFE Summits are great because they include educators from a vast majority of backgrounds and teaching positions. In this blog post, I will be sharing what I think may be useful for division one teachers.


Apps, Extensions, Add-Ons, Links and Tips Oh My

I stole this title almost straight from Michelle Armstrong who did a session on apps, extensions and add-ons. However, I will be sharing ideas from a variety of sessions.

What Are They?

Apps and extensions are mini-programs that enhance the Chrome browser. Add-ons are usually former scripts that enhance Google Document or Google Sheets. You access all of them from the Chrome Web Store. Note, there are two add-on stores: a Docs Add-On store and a Sheets Add-On store.  Like all things on the Internet, not all apps/extensions should be trusted. Check out the ratings and reviews. Also, it should be noted that having too many extensions running, doing so can slow down your browser. You can still have them installed but turned off until needed (see below for an extension to help with that). 

Extensions

  • Awesome Screenshot  - allows you to edit, annotate, and share images. What I liked is that you could blur out part of an image. 
  • Speak It and Announcify - read websites out loud.
  • Extension Manager/Switcher - allows you to easily turn on and off your extensions.  
  • Adblock and Adblocker Plus - Block advertisements. How are they different? One forum I read said that Adblock is developed originally for Chrome, and Adblock Plus comes from Firefox.
  • One Tab - When you have a number of tabs open, OneTab will convert all of your tabs into a list.
  • Screencastify - video screen capture software.
  • Read and Write For Google - Free for teachers! In the premium version, it has a variety of for reading and writing supports. In the free version, students can have text read to them in Google Document.
  • Boomerang for Gmail - remember MS Outlook's delayed send option? This replaces it for Gmail, basically it schedules messages to be sent at a later time.
Want more extension ideas? Check out the blog post Great Classroom Specific Chrome Extension by Holly Clark (who is a regular GAFE Summit presenter).


Apps

  • Pixlr - photoshop but easier
  • Tab Timer - timer shows in the tab while you work in other tabs


Add-Ons


  • Doctopus (for Sheets)- a super easy way to share documents from your drive with others. Google Classroom looks like it will do the same. 
  • Flubaroo (for Sheets) - a grading add-on. 
  

Links


Tips

  • If you have the new Google Drive, change your drive to grid view and colour code your folders. If you associate one colour for each class / subject / theme and use then use that colour scheme across all your google apps.

  • Edit (or completely remove) your bookmarks’ names so they are only icons, giving you more bookmark toolbar space.

Monday, August 18, 2014

Teacher Made Materials Using GAFE...in Division One


Thanks to Kelly Maxwell for sharing how she uses video in her grade two classroom. Students watch videos embedded in Presentation and then record what they have learned in a paper booklet. 

Friday, May 9, 2014

Virtual Lego??? Grade 1 Science-Building Things


Grade 1's love the Science unit, "Building Things". This year I tried Lego building with a twist of technology. Through google apps I found a Lego Builder app. It is a great app that allows students to use their imagination in a new way. My end goal was to have each child build a structure that had a purpose. I wanted it to be open ended to allow for students choice.

To begin I had to get the app on each of my students users. This was labour intensive for me and my EA because I did this in October when they were still learning the basics of logging on. In hind site I would have had older buddies in to help or requested a few parents to help with this  or possibly log on for them and add it for them ahead of time. You decide what works best for your school community. When they were finally on I told them to explore and try to figure out how to build. It is not easy if you have a high percentage of students without experience with basic computer skills. In my case I found that my students were not willing to take a risk and try so this first lesson did not go well.

Attempt two with the Lego Builder App,  I decided to start by doing a demo on the Smartboard.  I reviewed how to find the app on the Chromebook, then I modelled the basics of how to choose, place, turn the bricks. Off we went and this went significantly better. Everyone was able to build and some took risks this time and figured out how to change the colours of the bricks. I followed this lesson with four or five exploration/ practice times.

The next step was to have our grade 3 buddies join us for building a structure for the first time. The grade 3's had not used this app so it was a great opportunity for the grade 1's to teach the basic skills to older students and then the grade 3's helped them plan a structure that had a purpose. They built bridges, cars, houses, castles, boats and an ice rink. This time I had a few partners discover that they could turn their structure to see it from all angles.

Finally we were at the point where the grade 1's were going to build independently! I added a little more motivation by letting them know that I was not the only one who was going to see their work. We were going to make a YouTube movie showing their work and recording them describing their structure. Now we added the complication of needing to save their work so they could go back over a number of classes. This became a bit of a challenge. Students need to go to sign in to Publish your design. To do this students go to the top right of the Lego Builder App where it says sign in. They then have to enter their G-mail and password. They then click sign in with Google and are prompted to enter it all again. It is a bit tedious but most of my students were able to follow step by step and complete this independently. They then will need to hit save periodically as I found with all of the students working at the same time it would freeze and they would lose their work. They learned quickly to save every couple of minutes.

The products they built were creative and when making the movie we found a lot of them had created a story that went with their structure. To make the You Tube video I used the You Tube Capture App on my phone and recorded each child's segment. They had their structure on the Chrome book and then they manipulated to show what they made and what it's purpose was. Some described what it was and how they made it. Some told a story about what was happening. Some reflected on what they liked the most and what challenges they had while using the app. I then had Chrome books set up at the Celebration of Learning and parents watched the video of their child's work.

To improve this project for next year I would have limited the speaking time for each student as the final product had to split into two parts. I would have provided time for them to practice speaking to a partner about their structures so they had louder voices.

What I loved about making this movie as their presentation of their learning, is that students who would not have been able to reflect in a written form were provided success. All students were excited and engaged in trying their best. This open ended task resulted in some traditional looking structures and some very creative structures and this allowed for greater success.

I have shared a link to part 1 of Grade 1 Builds below.


http://youtu.be/9toWxbTx5LE

Tuesday, April 8, 2014

A Reflection on: Redefine the Elementary Classroom with GAFE

The Shoe Is On The Other Foot
(Reflecting on how I use tech in my grade two class.)


Holly Clark's session, Redefine the Elementary Classroom with GAFE, at The second annual EdTechTeam Alberta Summit featuring Google for Education left me more frustrated than inspired at first. She had great ideas but I found myself thinking "who seriously has the time to be able to do all that?" which is what I often here when I speak to colleagues about what I do using GAFE in the elementary classroom. This disconnect within my own attitude agitated me. Why?

I think it is because I consider myself a fairly motivated person when it comes to the integration of educational technology and differentiation, yet the possibility of achieving much of what she shared feels somewhat out of my control and/or overwhelming:
  1. access to adequate technology (and here I include bandwidth)
  2. time to effectively redesign what we teach in our classroom
  3. time to learn the technology/programs
I also think that when it comes to technology integration, many of my technology peers are on the same page as I am, so my PLN is a bit of an echo chamber. 

Looking back on her slides from her presentation, I can contemplate, with less agitation, on her message and suggestions. And so, I reflect.


Tomorrow's Literate Person

One of the things she discussed was the difference in what a literate person will need in the future. "If they can do the worksheet, they don't need it. If they can't, it won't help them." She used a Marc Pensky's example to illustrate this (see the image on the right). I would argue that this already almost outdated and we need a fourth column ... What is coming next? And that's the challenge in education at the moment isn't it? It's hard to predict what tomorrow's literate person will need because technology is changing so rapidly. The bigger issue is that so much of our instruction is still in the first column. She challenged us to think like Wayne Gretzky as teachers, we need to teach to the future.  


I Am Tomorrow's Literate Person... Sort Of

So why do I think this is already outdated? Because I already am tomorrow's literate person... well, almost.  

  1. Okay, so I do not work in a virtual community but I do collaborate in a virtual community and the majority of  my PLN is on Google+ and Twitter. 
  2. I make videos for my classroom. While my kids think it's "cool" that I make videos, none have gone viral. 
  3. I have not yet written a program, but I have thought about making my own classroom games a number of times.   :-)


Sam's Arm? SAMR!

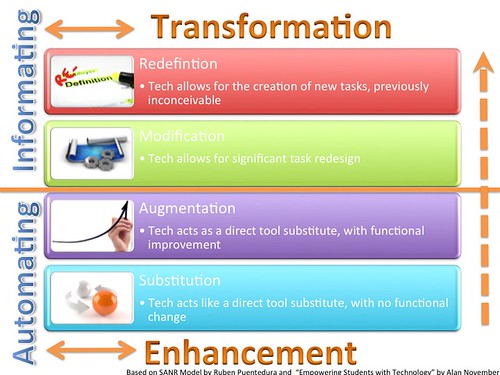
Like almost every other session at the Summit, SAMR was discussed. As I am still new to the SAMR model, I really appreciated the examples Holly gave for each 'rung on the ladder'. I would have loved more examples at different grade levels because, as always, I sometimes find thinking about how/if/when to implement technology into division one is a challenge. That said, I appreciated that Holly did given a video example of technology being used in a kindergarten classroom to illustrate redefinition. 

Her other examples were:

  • Substitution: Writing a paper -> Doing it in Word or Google Doc
  • Substitution: Reading from a textbook -> Reading from a PDF
  • Augmentation: Writing a paper -> Writing a paper with “comment coaching” from your teacher
  • Augmentation: Writing a persuasive letter -> Writing a persuasive e-mail
  • Augmentation: Retelling what you learn in social studies -> Use Google Docs Story Builder to retell
  • Modification: Writing a paper -> Collaboratively Writing a Paper with Another Classmate
  • Modification: Readers' Circle -> YouTube Book Talk Channel
  • Modification: Retelling what you learn in social studies -> Use Tellagami to retell. 
  • Redefinition: Writing a paper -> Collaboratively with a Classroom in Australia
  • Redefinition: Reading from a textbook -> Reading Collaboratively and collecting responses right in the document to help crowdsource comprehension.

Resources Recommendation

At the end of her session, Holly offered some recommendations and resources. 

Extensions!

First of all, she suggested that teachers limit the number of extension they have students use. I agree with her here. I would add, the younger the student, the less extensions. Her suggestions included:


Resources


Agitatedly Inspired?

Many of the sessions at the GAFE Summit inspired me to try something specific in my class. Despite my initial discomposure, I have to say Holly's session was the one that caused me the most reflection of my overall teaching practice and philosophy when it comes to educational technology. Additionally, but making her presentation available online, I was able to look back over her messages and examples again. 

I'll end with an image (by Wesley Fryer) she shared near the end of her presentation (labeled for reuse according to Google search!) and ask you: what do you want your students to create today? And how are you going help them do so?


Tuesday, October 29, 2013

Read & Write for Google

Read & Write for Google

Get this app from Google and try it out for 30 days free. This is a text-to-speech and word-prediction tool that supports Inclusive Education, ELL, and UDL. I heard of it for the first time today at the community of practice. It can be used with Google docs, epub or while browsing websites. You can use it to simply read aloud text to students who are struggling, reluctant readers. It will highlight the sentences being read as well as highlighting each word as it reads. It has a variety of voices to choose from as well as the languages English and French. Hopefully they will add more down the road. As the student listens or reads a document, story or website independently they can stop, highlight a word they do not understand and click on either the dictionary for a definition or the picture dictionary to see a picture which will deepen comprehension.

Another use for this app is to create a document that provides a personal dictionary of words students struggled to comprehend when reading. Students can highlight words they did not understand or could not read and use the multi-coloured arrow tool to group them into a document. It can then be shared with you the teacher to provide you with information of vocabulary to review, or introduce, to build students English vocabulary. These documents are automatically created when the coloured arrow icon is clicked and it will be saved in the students drive. They need to remember to name the document so they can refer to it again or share it with you or others. 

There is one last icon you need to know about. It is the vocabulary icon that has 3 bullets with lines. After students highlight words they are unfamiliar with, they then click on the icon and it will automatically create a document. It will provide them with a personal dictionary that includes a picture, if it is available, and a written definition or synonyms for the words. This is also saved in the students Google drive. Remind your students to rename the document so they do not have a long list of untitled docs. This can be useful in growing basic vocabulary or as a research tool. 

It will be a word prediction tool in the near future as well. Look for this update coming soon!

Please add comments to this post if you try it out and find different uses for the app. I have added a link to a document that was used in the presentation I was at. Please make a copy of it and try navigating through the different icons. You will have to add it to your Google apps connected to your user. Search for it on Google Chrome or look for it under the apps icon on a Chromebook. You can also search for it under your drive , create button, connect more apps. Once I have tried this with my students I will do a follow up post.

Read and Write for Google Treasure Hunt- Created by Lindsay Ballance (ILS)


Wednesday, October 23, 2013

Chrome Books in Grade 1... CRAZY... not really...

Getting Started
First thing you need to know is all passwords must be changed if your students have not done so. I recommend you add a 1 to all existing passwords as that seemed to be the easiest for me. They were eager and excited to go as was I. We used a buddy system so only half my students had to log on so I only had  half the problems. The next time they would swap so after two visits everyone would have logged on. This provides scaffolding for the students who may struggle.  I had a plan to show them what they could do once they got on, so they were motivated to be independent. I chose a free app called Lego builder that I would help them get.(Fits with building things curriculum in science) Everything was going as well as expected with 11 of 22 grade 1's logging on for the first time when we reached a road block. After they got all of the email and password in they received a security message where they need to type the funny written letters. In grade 1 they have a hard time with proper letters so this required a lot of patients from myself and them.This happens the first time you use the email and password. As it turns out having only half log on at a time was smarter than I thought. I have an EA who was able to help so those of you that are flying solo you may want to do this one at a time in the class or have a couple volunteers to help you.

Step 1-I started modelling in the classroom showing them the basics of what logging in to a computer would             look like. I also showed them how it did not work if they even made one mistake. We talked about               how to problem solve by checking each letter one by one and retrying the password carefully and                 slowly.

Step 2- I took out one Chrome book and modeled how to log on and how to get @ symbol. They chanted               "hold shift, tap 2" repeatedly until they had it stuck in their brains.

Step 3- Show them the Lego building app they will use,  if they can get on. Insert " wow, cool, so fun"                  here. This is the carrot you need to dangle for motivation. Go on the Chrome book look for what will              work in your class. Under apps, education there are many free ones that your students will love. Just               remember you will have to model how to get the app and help them get it. Once they have it, it will be           there forever.

Step 4- Release the Chrome books to the partners. Wait for it.... they all get on with minimal assistance                     (funny written security word)  and enjoyed the app. Some students did it in 10 or 15 min others only              had 5 min to build but they all were successful. They were able to take turns and build.

Step 5- Repeat next time so the other 11 students can log on.

Thursday, September 26, 2013

What Am I Crazy? Moving My Class Website to Google Sites

Some History

When I first started using the Internet with division one students many many many years ago, it was quickly apparent that too much time was spent having them type websites into the address bar. Initially I created a Word document with hyperlinks and saved it in a shared folder on our server. I taught them how to open that document and all they had to do was click on the hyperlinks. I just changed the content of that document for each technology lesson. Eventually I made my first class website on Tripod way before it was Tripod.Lycos! Later I moved it to Wordpress as I did not like the banner ads Tripod had.  


I Like Wordpress

I like Wordpress and have used it for over five years. It was relatively easy to learn and use. The URL for my site is http://msmondor.wordpress.com/ which meant when students searched "msmondor" my site was the first thing they found. I made Ms Mondor a spelling word in the first weeks of school. Things I like about Wordpress:

  • You can schedule posts.
  • It is user friendly.
  • It is free without a lot of annoying ads.
  • You can customize an easy to find URL.

So Why Move?

When EPSB first "went Google" I tried Google Sites and I hated it. It was clunky. So I pretty much ignored that part of Google Apps for Education. Last year I made a landing page for my former school using Google Sites. My, had things changed. It had all the things I liked about Wordpress plus I could make the interface more division one friendly than I could with Wordpress. I will miss my short and convenient URL. Things I like about Google Sites:
  • You can schedule posts.
  • It is free without annoying ads.
  • Can upload files for parents. For example on my math page I have math games that we've played at school.
  • Division One friendly interface.
  • Can integrate other aspects of Google Apps for Education easily.
  • It is easy to use after some initial trial and error/instruction.
  • There are templates to use create class websites.

Links to Consider Viewing

Sunday, August 18, 2013

Flashback Post To Help With School Start Up

Div1Edtech has a number of blog posts that may be useful for  technology planning and for school start up. 


Class Landing Page

Late August/early September is a great time to set up a class website or landing page. Check out the post A One Stop Shop! The Benefits of a Class Website to see why! I am thinking about setting up this year's class website using Google Sites. Check out the student landing page I made using Google Sites for my previous school: Together We Accomplish More


EPSB Staff cab also use SchoolZone as a landing page. Put the websites you will regularly use as links on the Resources section! If it is your first post there, it will stay at the top for the rest of the year which will make it easy for your students to access from home and school regularly.


Subscriptions

Part of setting up your classroom is thinking about resources, traditional and digital. What subscriptions are worth the money? Check out the blog post Subscriptions and Sign Ups as a jumping off point. 


Technology Lesson-Unit-Year Planning

As you put together your year plan, think about how you might incorporate technology. In the 2012-13 school year I tried to chronicle my technology use in the very long post This is the blog post that doesn't end. Yes, it goes on and on my friend. 

In division one it is important to plan for teaching basic technology skills at the beginning of the year. These first steps can be daunting at times. Check out the blog posts below for some tips and ideas:

Post Your Suggestions!

Please post your tips, links and suggestions in the comments for division one technology school start up ideas!

Wednesday, April 3, 2013

Paper or Netbook? The Student Decides.

What Normally Happens In The Morning For Bell Work

My students get a package on Monday that they can work on at their own pace in the mornings and that we review the answers for throughout the week. A paper-pencil activity is convenient for bell work in the morning. Typically they have an acrostic poem to complete as well, but I removed that from this experiment.


Choice Experiment

I decided to do a two week long experiment with my morning work routine. For three out five days I gave my students a choice. They could do their morning work on paper or on a netbook. I was curious if this would be time effective. We use netbooks quite often in my class, so my students are very proficient with getting the netbooks out, getting logged on and then returning the netbooks at the end. Each activity is no more than 20 minutes, some only 15 minutes or less. My students were also proficient with the online activities that they had to choose from.


Monday - New Words

They write their new spelling words into their agenda and get their choices for the week.


Tuesday - Practice Words

Paper choice - Look-Say-Cover-Write-Check
Netbook choice - Spelling City "Test Me" (I have a free Spelling City account)


Wednesday - Sentences

Paper choice - Five sentences on lined paper
Netbook choice - Five sentences on Google Docs


Thursday - Fill In The Blanks

All do this on paper due to going to music in the morning. 


Friday - Fun With Words

Paper choice - word search
Netbook choice - Spelling City or Spellodrome activities

Reflections

  • I was surprised by the number of students who chose paper activities. Out of 17 students, each day there were 3-5 students who chose the paper activities both weeks. 
  • Using technology for these short tasks did not add on as much time to the activities as I thought they might. Both groups (paper and netbook) finished their activities at about the same time.

What Next?

Going forward I am going to continue to give my students a choice for the sentence work on Wednesdays. On Fridays, I may try having students do their weekly poem using technology and early finishers can review their words online.